
Quick Start
If you're looking to retarget animations quickly and aren't interested in setting up the retargeter yourself, you can find a project I've setup on my GitHub page.
Mixamo
Head to Mixamo, login and navigate to the characters page.
Find the X Bot Character, select it and click the "Download" button.
In the download settings, make sure the following are selected:
- Format: FBX Binary (.fbx)
- Pose: T-pose
Next, you'll want to head to the "Animations" page and find the animation you'd like to retarget, I will be using the "Reaction" animation.
Once you've decided on the animation you will be using, click the "Download" button.
In the download settings, make sure the following are selected:
- Format: FBX Binary (.fbx)
- Skin: Without Skin
- Frames per Second: 30
- Keyframe Reduction: None
That should be everything you need from the Mixamo side.
Unreal Engine
If you don't already have an Unreal Engine project, go ahead and create one, I will be using the Third Person template.
Once your project is ready, you'll have to create a few folders for the sake of keeping things clean & consistent with the existing Unreal Engine folder structure.
First, create an XBot folder under the Content/Characters directory, then create the following sub-folders: Animations, Materials, Meshes and Rigs. The created file structure should look like:
- Characters
- XBot
- Animations
- Materials
- Meshes
- Rigs
- XBot
Import the X Bot Character
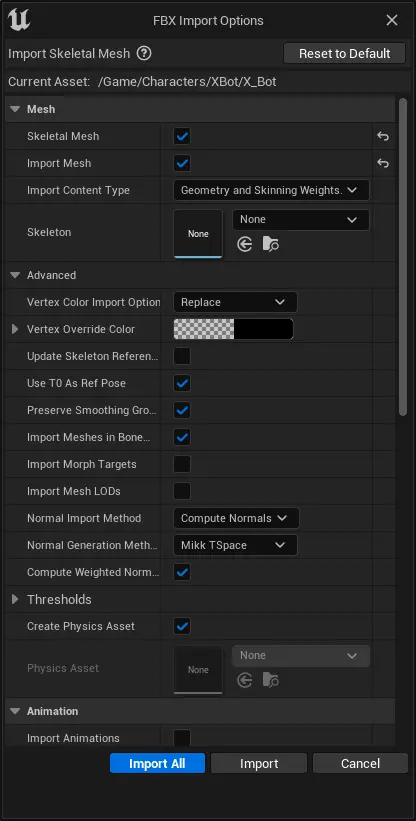
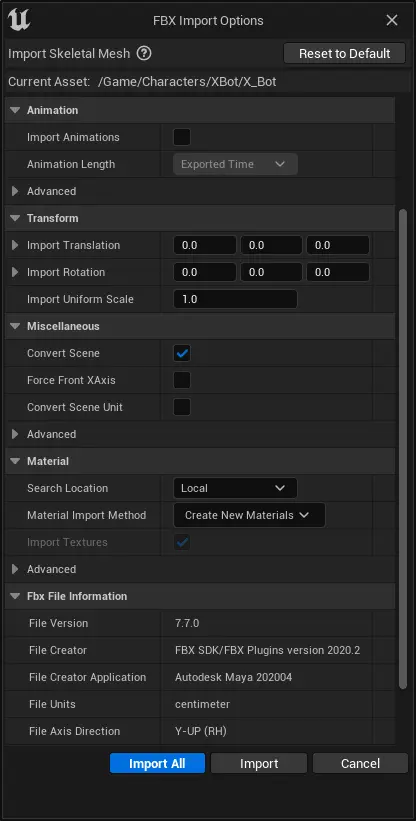
Inside the XBot folder, right-click on the Content Drawer and navigate to Import to /Game/Characters/XBot... in order to import the X Bot Character. You should see a prompt pop up, ensure you have the Use T0 As Ref Pose option checked and click Import.
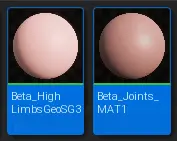
- Move the materials to the Characters/XBot/Materials folder.
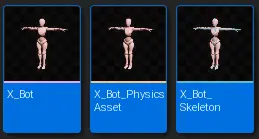
- Move the Skeleton, Skeletal Mesh & Physics Asset to the Characters/XBot/Meshes folder.
Import the Animation
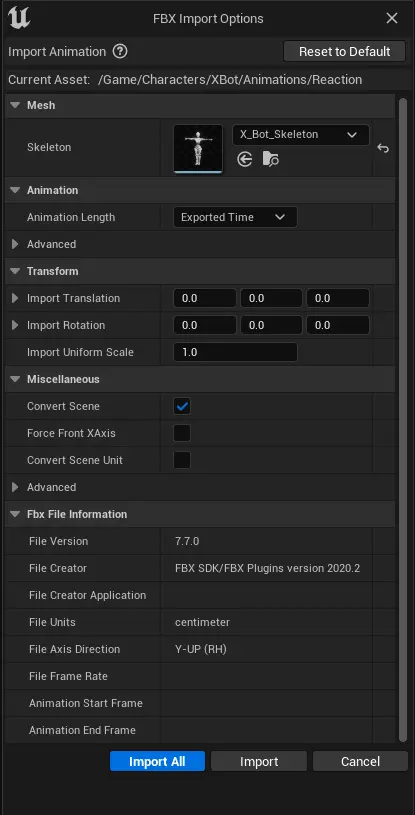
Inside the XBot/Animations folder, right-click on the Content Drawer and navigate to Import to /Game/Characters/XBot/Animations... in order to import the animation. When the prompt pops up, select the X_Bot_Skeleton as the Skeleton, and click Import.
Create an IK Rig
Inside the Characters/XBot/Rigs folder, right-click on the Content Drawer and navigate to Animation > IK Rig in order to create an IK Rig.
You will be prompted to pick a Skeletal Mesh, pick the X_Bot Skeletal Mesh which was imported in the previous steps, and name the created IK Rig: X_Bot_Rig.
Setup retarget chains
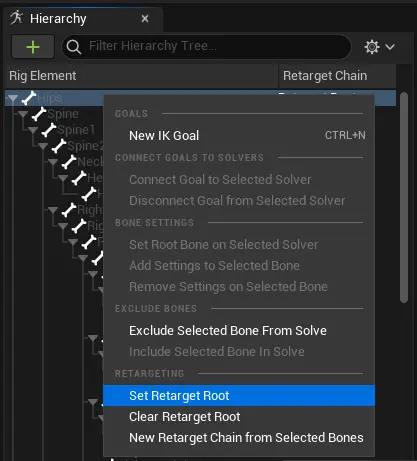
Open up the X_Bot_Rig, in the Hierarchy tab, right-click on the Hips bone and select the Set Retarget Root option.
right-click the Hips bone again, this time select the New Retarget Chain from Selected Bones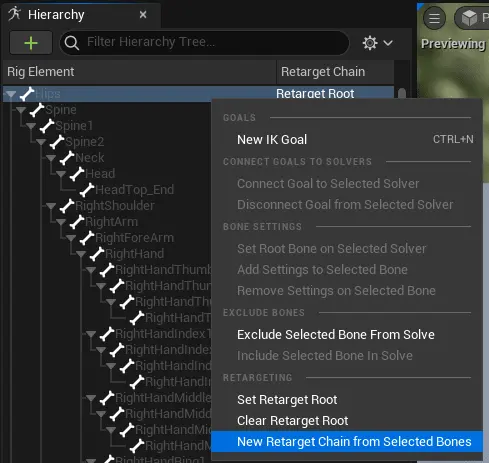
Name the bone chain: Root, click OK.
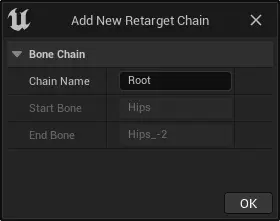
If prompted to "Add goal to end bone, Hips of new chain, Root?", select No Goal.
That should be the chain created, you should be able to see it in the IK Retargeting tab.
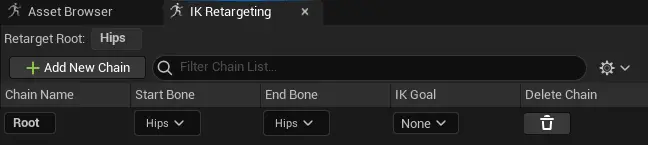 (Note: You can also add a new retarget chain using the Add New Chain button.)
Next, you'll want to retarget the Spine, select Spine through Spine2, right-click and select New Retarget Chain from Selected Bones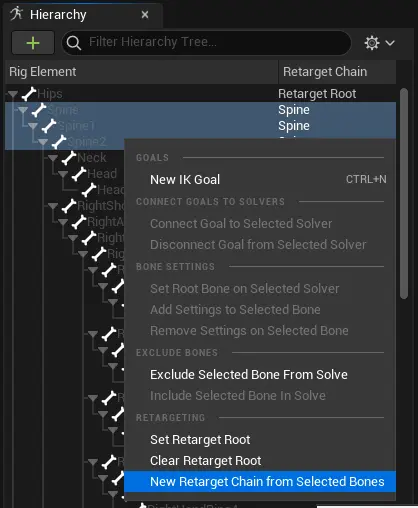
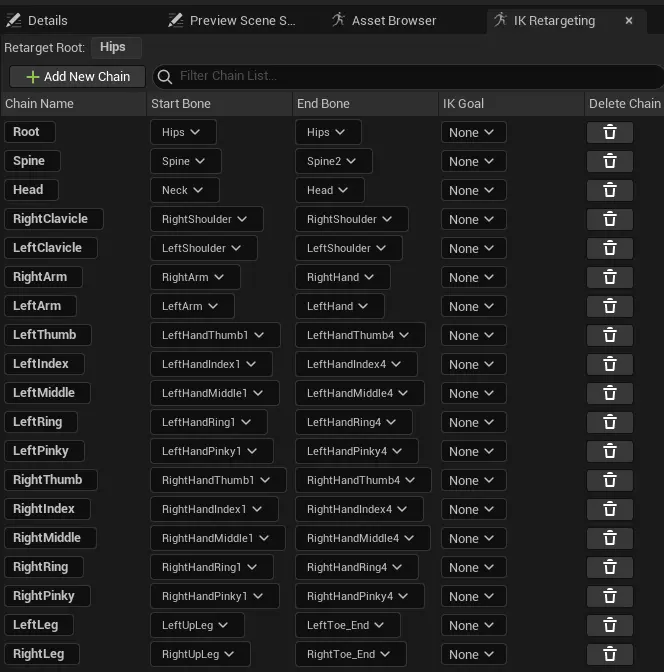
The process is pretty repetitive and straight forward from here on out, so I will just list all the bone chains you have to retarget, just follow the same process from above for the remaining bones.
| Chain Name | Bones |
|---|---|
| Root | Hips |
| Spine | Spine, Spine1, Spine2 |
| Head | Neck, Head |
| RightClavicle | RightShoulder |
| LeftClavicle | LeftShoulder |
| RightArm | RightArm, RightForeArm, RightHand |
| LeftArm | LeftArm, LeftForeArm, LeftHand |
| LeftThumb | LeftHandThumb1, LeftHandThumb2, LeftHandThumb3, LeftHandThumb4 |
| LeftIndex | LeftHandIndex1, LeftHandIndex2, LeftHandIndex3, LeftHandIndex4 |
| LeftMiddle | LeftHandMiddle1, LeftHandMiddle2, LeftHandMiddle3, LeftHandMiddle4 |
| LeftRing | LeftHandRing1, LeftHandRing2, LeftHandRing3, LeftHandRing4 |
| LeftPinky | LeftHandPinky1, LeftHandPinky2, LeftHandPinky3, LeftHandPinky4 |
| RightThumb | RightHandThumb1, RightHandThumb2, RightHandThumb3, RightHandThumb4 |
| RightIndex | RightHandIndex1, RightHandIndex2, RightHandIndex3, RightHandIndex4 |
| RightMiddle | RightHandMiddle1, RightHandMiddle2, RightHandMiddle3, RightHandMiddle4 |
| RightPinky | RightHandRing1, RightHandRing2, RightHandRing3, RightHandRing4 |
| RightRing | RightHandPinky1, RightHandPinky2, RightHandPinky3, RightHandPinky4 |
| LeftLeg | LeftUpLeg, LeftLeg, LeftFoot, LeftToeBase, LeftToe_End |
| RightLeg | RightUpLeg, RightLeg, RightFoot, RightToeBase, RightToe_End |
It's important you use the same names for the chains of bones I've specified, otherwise you may have issues later on when you create the IK Retargeter, as it uses a fuzzy string match to pair the chain names of each IK Rig.
Create an IK Retargeter
In the Rigs folder, right-click on the content drawer and navigate to Animation > IK Rig > IK Retargeter, to create an IK Retargeter. When prompted to pick an IK Rig to copy animation from, select the X_Bot_Rig you created in the previous steps. Name the IK Retargeter: X_Bot_Retargeter.
Open the X_Bot_Retargeter you just created. In the Target IKRig Asset field, select IK_Mannequin.
I will be using SKM_Quinn as the Target Preview Mesh, but SKM_Manny should work as well.
Remove Source Chains
In the IK Retargeter, you will have to set every Metacarpal, Twist & IK Target Chain to Source Chain values of None, otherwise you may have some weird results. For the following Target Chain values, set Source Chain to None:
| Target Chain | Source Chain |
|---|---|
| LeftIndexMetacarpal | None |
| LeftMiddleMetacarpal | None |
| LeftPinkyMetacarpal | None |
| LeftRingMetacarpal | None |
| RightPinkyMetacarpal | None |
| RightRingMetacarpal | None |
| RightMiddleMetacarpal | None |
| RightIndexMetacarpal | None |
| LeftLowerArmTwist01 | None |
| LeftLowerArmTwist02 | None |
| LeftUpperArmTwist01 | None |
| LeftUpperArmTwist02 | None |
| RightLowerArmTwist01 | None |
| RightLowerArmTwist02 | None |
| RightUpperArmTwist01 | None |
| RightUpperArmTwist02 | None |
| RightCalfTwist01 | None |
| RightCalfTwist02 | None |
| RightThighTwist01 | None |
| RightThighTwist02 | None |
| LeftCalfTwist01 | None |
| LeftCalfTwist02 | None |
| LeftThighTwist01 | None |
| LeftThighTwist01 | None |
| FootRootIK | None |
| LeftFootIK | None |
| RightFootIK | None |
| HandRootIK | None |
| HandGunIK | None |
| LeftHandIK | None |
| RightHandIK | None |
Matching poses
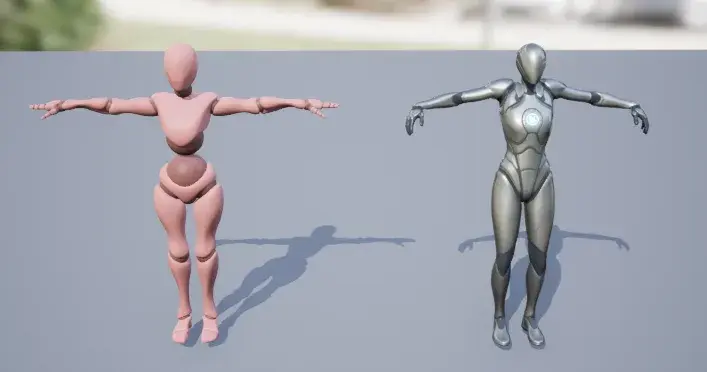
When you click on the Run retargeter button, you should see our retargeter in action, however, you will also notice that the poses from the two characters do not match.
 (Note: If your characters are overlapping, you can move one of them using either the Target Mesh Offset or the Source Mesh Offset.)
In order to get good-looking animations from the retargeter, both the target and the source character poses need to match.
You could match the poses manually by rotating every single bone in the target skeleton until you get a perfectly matching T-pose, but I have an easier and more accurate solution.
Navigate to the target skeletal mesh you are using for retargeting, in my case: Characters/Mannequins/Meshes/SKM_Quinn, right-click and select Asset Actions > Export... to export as a .FBX, the default options should be fine.
Head back to Mixamo, login and navigate to the characters page.
Click the Upload Character button and upload the character you just exported from Unreal Engine.
Once the character has finished processing and has been uploaded successfully, click the Download button.
In the download settings, make sure the following are selected:
- Format: FBX Binary (.fbx)
- Pose: T-pose
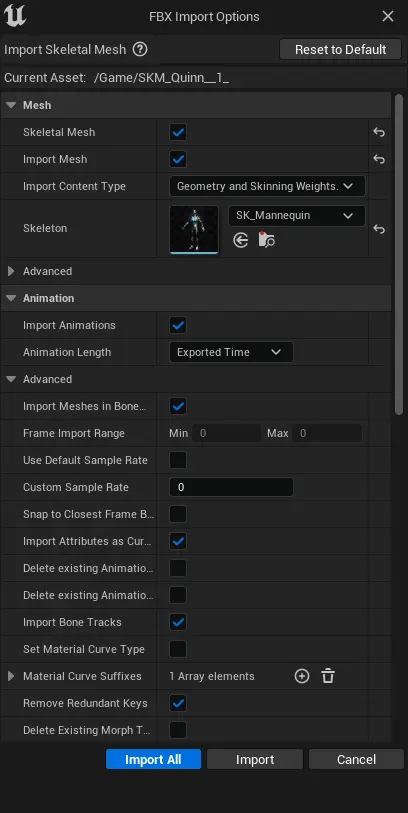
Import the character back into Unreal Engine, set the Skeleton to SK_Mannequin the rest of the import options should be fine.
That should have imported a bunch of assets, what you're interested in is the T-posing Animation Sequence, right-click it and click Create > Create Pose Asset, then click Accept.
Open the Pose Asset you just created, it should have two poses, make sure you set the Weight of the second one to 1.0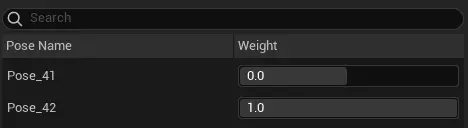
You should now have a T-posing character.
Delete every imported asset, except for the Pose Asset you just created, as you won't be needing anything else.
Open the X_Bot_Retargeter, in the Target tab, click Create > Import from Pose Asset, select the Pose Asset you created in the previous steps and click Import New Retarget Pose.
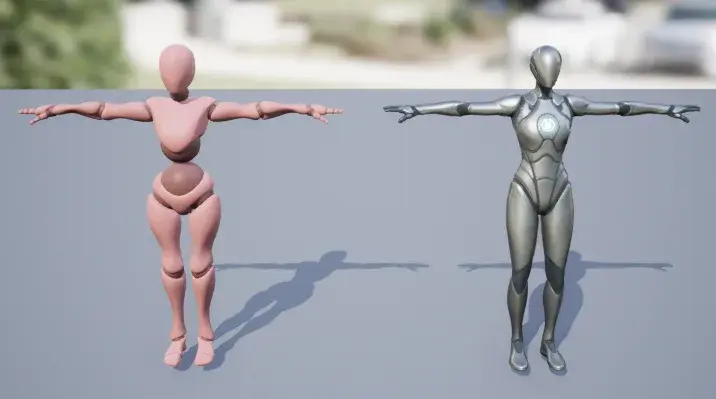
You should now see both the X Bot and Quinn in the T-pose state.
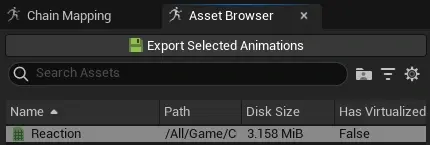
If you open the Asset Browser tab in the X_Bot_Retargeter, you should see a list of Animations you have imported which you can retarget.
Double-clicking any animation should play a preview in the retargeter, and if you've followed all the steps they should match up nicely.
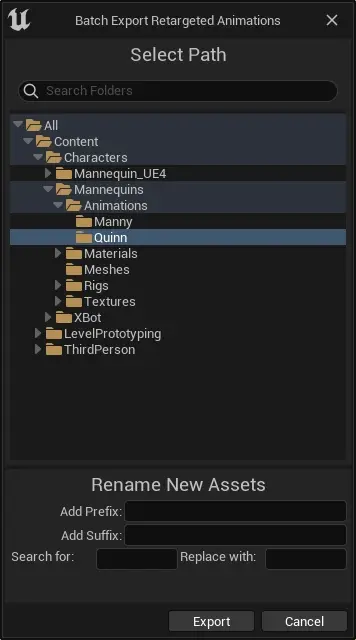
You can now export animations to the target character from within the X_Bot_Retargeter, in the Asset Browser tab, using the Export Selected Animations button.
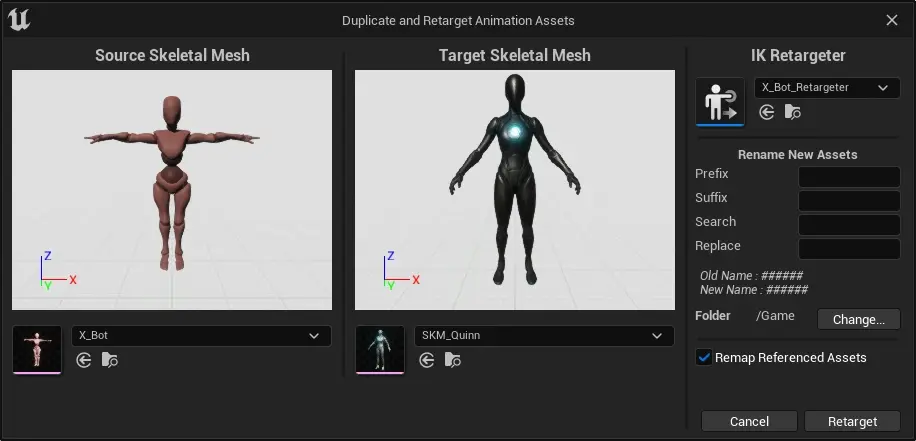
You should also be able to retarget X_Bot animations from the Content Drawer by right-clicking them in the asset browser and selecting Retarget Animation Assets > Duplicate and Retarget Animation Assets. Just be sure to select the X_Bot_Retargeter as the IK Retargeter.
It took a while to set up, but that's the retargeter ready to be used for all your animation needs. If you'd like to learn more about animation retargeting in Unreal Engine, check out the docs.